ICS Filter Replacement GuideUpdated 3 months ago
Be Prepared
- Make sure to protect surrounding area from possible water spill
- Make sure to have a standard flat head screw driver to open air valve
- Get rag and prepare diluted bleach water. Dilute household bleach ¼ cup to a gallon of water. Note: it is critical to read and follow safety instructions with any product you use
- If needed have a container ready to collect water from housing, typically 3-5 gallons will be fine
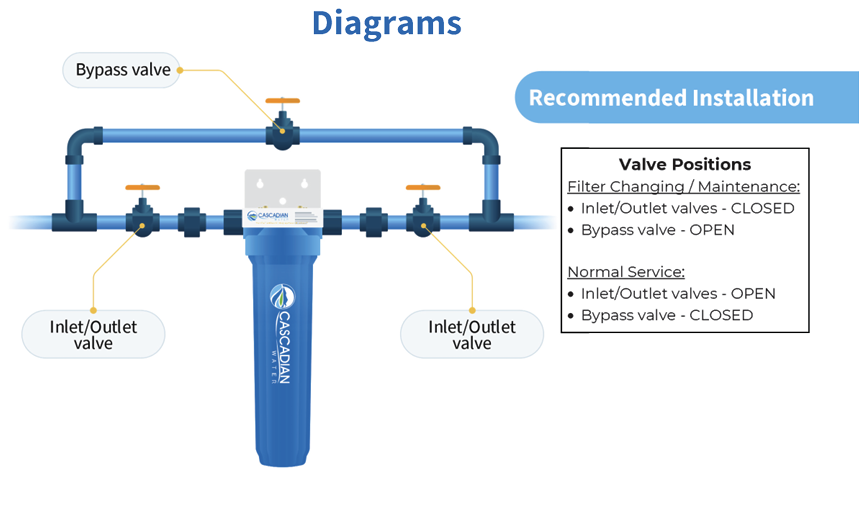
- Housing Cap has arrows indicating flow direction. If not clearly identified mark valves and Cap for future reference
- Locate optional Bypass valve
- Please note the generation of system that you have.
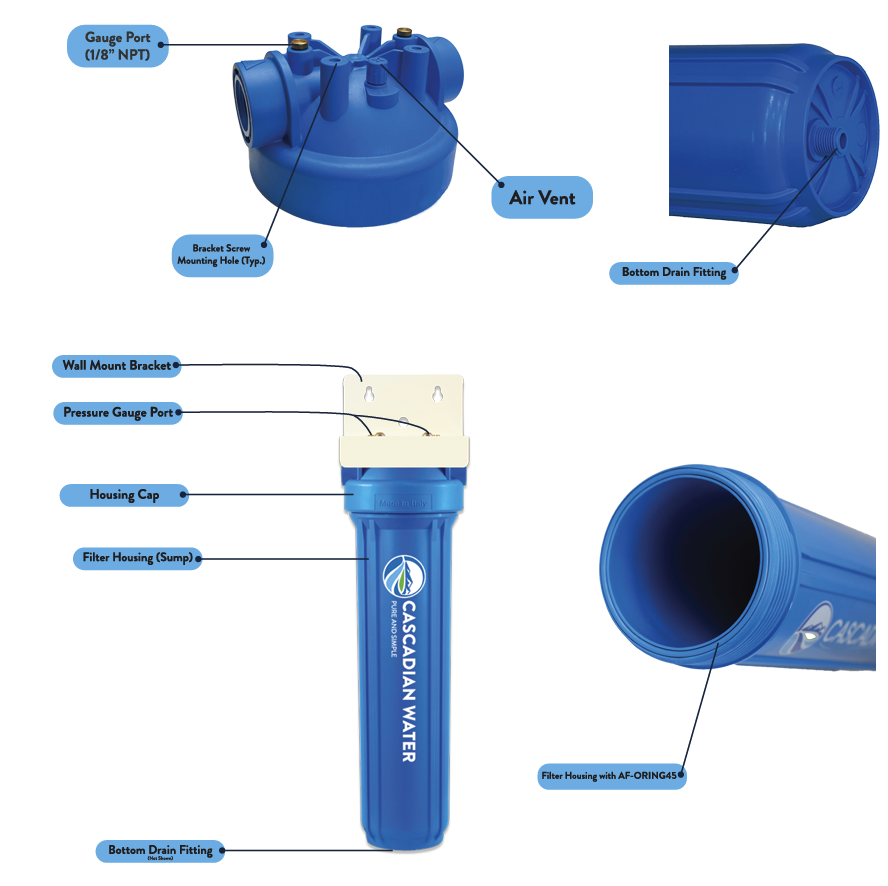
- 1st Gen has a black cap so it needs a Black O-Ring (P-151122)
- 2nd Gen has a blue filter cap, so it needs a Blue O-ring. (AF-ORING45)
Replace Filters
- Drain the Housing(s)
- Start by turning off the water Inlet and Outlet valves
- Open Bypass valve, if present. This allows raw water to be delivered to the home
- Empty the Housing by opening the Housing Bottom Drain Valve
- Open the Air Vent 2-3 turns to relieve pressure and allow Housing to drain
- Remove Housing
- Once empty, with the wrench on the sump and handle facing you, turn the handle to the left to loosen
- Finish removal by turning with hands. Caution: Support the bottom of the housings, the housings will be heavy and potentially slippery, so take precautions do not drop and damage Housing or Bottom Drain Valve
- Remove and dispose of used filters or contact local waste services for green options. Please note: Filters are not reusable, do not try to clean and re-use old filters.
- At this point, it is important to stop and disinfect the housing prior to installing the cartridges. That includes washing your hands, but also wiping the inside with a clean cloth and diluted bleach, you can also use a spray bottle to clean cap
- Check O-ring making sure it is clean, not swollen or disfigured, a flattened o-ring will not seal, apply included silicone lubricant on all surfaces of the o-ring to ensure a good seal
- Close the Housing Bottom Drain Valve
Install New Filters
- Important Notes
- If you are using a filter System with PolyCorTM, then make sure to insert the Blue Cap Up in the Housing
- If you are using an ICS-PK, ICS-PHK, or ICS-HK, then install the gasketed end up in the Housing
- All others can go either way
- To fully seat the filter in the Housing, place the bottom hole onto the centering post in the bottom of the Housing.
- Remove the protective wrap on the filter. If replacing two cartridges remove protective wrap one at a time taking note as to which filter goes into which housing
- Insert filters into Housing following notes above. For proper operation be sure to install the filter(s) in their according to flow direction, filters would have 1 and 2 stickers to show flow orientation
- From here, once complete, hand-tighten DO NOT use the Housing Wrench to re-install the Filter Housing to Filter Cap. This will seize the housing and make it difficult for next filter change. if there is still leaking, remove the housing, replace o-ring and try again.
Prepare for Use
- Close valves: Inlet, Outlet, Bottom Drain, Bypass Valve
- Open inlet valve just enough to let water flow slowly. This will fill the Housing with water and force air out the Air Vent
- Watch for water to come out of the air vent
- Close water inlet valve then wait for air valve to stop spitting air, then close air valve, this is to allow the o-ring to seal properly
- Fully open inlet valve and check for any leaks and repair if needed. Pay close attention to the O-ring between the Cap and Housing
- Fully open a treated water tap downstream
- Let the water run for five minutes or until it runs clear to ensure all filter fines and air bubbles are evacuated from the system.
- Pop bubble on filter monitor and stick to your fridge or system to remember when to change filter next